In this tutorial, we’ll go through covering interceptor, which is a very crucial feature of Dio. You can find the entire source code for the project here: dio_tasker
Understanding Interceptors:
What is an interceptor?
An interceptor in Dio is a powerful feature that allows us to intercept and modify HTTP requests and responses before they are handled by the application.
Interceptors can be used for various purposes such as logging, adding headers, handling errors, and more.
Benefits of using Interceptors:
Centralized Logic: Interceptors allows us to centralize logic that should be applied to multiple requests or responses, such as adding authentication tokens or logging.
Code Reusability: By using interceptors, we can avoid duplicating code across different parts of our application.
Error Handling: Interceptors can be used to handle errors globally, providing a consistent way to manage errors across our application.
Request/ Response Modification: We can modify requests and responses, such as adding headers, transforming response data, before they reach application logic.
Logging: Interceptors are useful for logging requests and responses, which can help with debugging and monitoring.
Since interceptors are such a crucial concept, we’ll go through 5 sub tutorials that’ll cover all the aspects of interceptors.
Tutorial 1: Basic Logging Interceptor
Our objective is to create a simple logging interceptor to log all the requests and responses.
Create a Logging Interceptor:
- Within our dio_tasker let’s create a new file
lib/interceptors/logging_interceptor.dart
import 'package:dio/dio.dart';

class LoggingInterceptor extends Interceptor {

  /// onRequest: This method is called before a request is sent.
  /// We log the HTTP method (GET, POST, etc.) and the request path.
  @override
  void onRequest(RequestOptions options, RequestInterceptorHandler handler) {
    // Log the request method and path.
    print('REQUEST[${options.method}] => PATH: ${options.path}');
    // Continue with the request.
    super.onRequest(options, handler);
  }

  /// onResponse: This method is called when a response is received.
  /// We log the status code and the request path.
  @override
  void onResponse(Response response, ResponseInterceptorHandler handler) {
    // Log the response status code and path.
    print(
        'RESPONSE[${response.statusCode}] => PATH: ${response.requestOptions.path}');
    // Continue with the response.
    super.onResponse(response, handler);
  }

  /// onError: This method is called when an error occurs.
  /// We log the error status code (if available) and the request path.
  @override
  void onError(DioException err, ErrorInterceptorHandler handler) {
    // Log the error status code and path.
    print(
        'ERROR[${err.response?.statusCode}] => PATH: ${err.requestOptions.path}');
    // Continue with the error.
    super.onError(err, handler);
  }
}
Add the interceptor to Dio:
- Let’s modify our
lib/services/api_service.dartto include the logging interceptor:
import 'package:dio/dio.dart';
import 'package:dio_tasker/interceptors/logging_interceptor.dart';

import '../models/tasks.dart';

class ApiService {
  final Dio _dio;

  ApiService() : _dio = Dio() {
    // Add the logging interceptor
    _dio.interceptors.add(LoggingInterceptor());
  }

  // Method to fetch tasks from the API
  Future<List<Task>> fetchTasks() async {
    try {
      // Make a GET request to fetch tasks
      final response =
          await _dio.get('https://jsonplaceholder.typicode.com/todos');
      // Parse the response data into a list of Task objects
      return (response.data as List)
          .map((task) => Task.fromJSON(task))
          .toList();
    } on DioException catch (dioException) {
      // Handle Dio Exceptions
      if (dioException.type == DioExceptionType.connectionTimeout) {
        throw Exception('Connection Timeout');
      } else if (dioException.type == DioExceptionType.receiveTimeout) {
        throw Exception('Receive Timeout');
      } else if (dioException.type == DioExceptionType.badResponse) {
        throw Exception(
            'Received invalid status code: ${dioException.response?.statusCode}');
      } else {
        throw Exception('Something went wrong');
      }
    } catch (e) {
      // Handle other errors
      throw Exception('Failed to load tasks');
    }
  }
}
Test the Interceptor:
- Let’s run the app and check the console for logs of requests and responses.

Perfect, so as we can see we are able to log both the request and response.
You can find the source code here: dio_tasker/03-01-logging-interceptors.
Understanding Headers
What are Headers?
Headers are key-value pairs sent along with HTTP requests and responses.
They provide essential information about the request or response, such as the type of content being sent, the length of the content, authentication details and more.
Headers play a crucial role in how the client and server communicate and process the data being exchanged.
Common Types of Headers:
Content Type: Specifies the media type of the resource. For example,
application/jsonindicates that the content is in JSON format.Authorization: Contains credentials for authenticating the client with the server. For example,
Bearer YOUR_TOKENis used for token-based authentication.Accept: Informs the server about the type of data the client can process. For example,
Accept: application/jsonindicates that the client expects JSON data.User-Agent: Provides information about the client software making the request. For example,
User-Agent: Mozilla/5.0.Cache-Control: Directs caching mechanisms on how to handle the request. For example,
Cache-Control: no-cacheinstructs not to cache the response.
Importance of headers:
Content Negotiation: Headers like
Content-TypeandAccepthelp in content negotiation between the client and server, ensuring that the data is in a format that both can understand.Authentication and Security: Headers such as
Authorizationare crucial for securing API requests and ensuring that only authenticated clients can access certain resources.Performance Optimization: Headers like
Cache-Controlcan significantly impact the performance of web applications by controlling how responses are cached.Metadata: Headers provide additional metadata about the request or response, which can be used for debugging, logging and monitoring purposes.
Now let’s look at tutorial where we add headers interceptor.
Tutorial 2: Adding Headers Interceptor
Our objective is to create an interceptor to add common headers to all requests.
Create a new Headers Interceptor:
- Let’s create a new file
lib/interceptors/headers_interceptor.dart
import 'package:dio/dio.dart';

class HeadersInterceptor extends Interceptor {

  /// onRequest: This method is called before a request is sent.
  /// We add common headers such as `Content-Type` and `Authorization` to the request options.
  @override
  void onRequest(RequestOptions options, RequestInterceptorHandler handler) {
    // Add common headers to the request.
    options.headers.addAll({
      'Content-Type': 'application/json',
      'Authorization': 'Bearer YOUR_TOKEN',
    });
    // Continue with the request.
    super.onRequest(options, handler);
  }
}
Add the Interceptor to Dio:
- Now, we have to modify
lib/services/api_service.dartto include the headers interceptor:
import 'package:dio/dio.dart';
import 'package:dio_tasker/interceptors/headers_interceptor.dart';
import 'package:dio_tasker/interceptors/logging_interceptor.dart';

import '../models/tasks.dart';

class ApiService {
  final Dio _dio;

  ApiService() : _dio = Dio() {
    // Add the logging interceptor
    _dio.interceptors.add(LoggingInterceptor());

    // Add the headers interceptor.
    _dio.interceptors.add(HeadersInterceptor());
  }

  // Method to fetch tasks from the API
  Future<List<Task>> fetchTasks() async {
    try {
      // Make a GET request to fetch tasks
      final response =
          await _dio.get('https://jsonplaceholder.typicode.com/todos');
      // Parse the response data into a list of Task objects
      return (response.data as List)
          .map((task) => Task.fromJSON(task))
          .toList();
    } on DioException catch (dioException) {
      // Handle Dio Exceptions
      if (dioException.type == DioExceptionType.connectionTimeout) {
        throw Exception('Connection Timeout');
      } else if (dioException.type == DioExceptionType.receiveTimeout) {
        throw Exception('Receive Timeout');
      } else if (dioException.type == DioExceptionType.badResponse) {
        throw Exception(
            'Received invalid status code: ${dioException.response?.statusCode}');
      } else {
        throw Exception('Something went wrong');
      }
    } catch (e) {
      // Handle other errors
      throw Exception('Failed to load tasks');
    }
  }
}
Log the Header:
We can check the request headers to ensure the common headers are included. So, we can modify our onRequest() in our LoggingInterceptor:
  /// onRequest: This method is called before a request is sent.
  /// We log the HTTP method (GET, POST, etc.) and the request path.
  /// We log the HTTP request headers
  @override
  void onRequest(RequestOptions options, RequestInterceptorHandler handler) {
    // Log the request method and path.
    print('REQUEST[${options.method}] => PATH: ${options.path}');
    // Log the request header
    print('REQUEST HEADER[${options.headers.toString()}');
    // Continue with the request.
    super.onRequest(options, handler);
  }
Test the Interceptor:
Let’s run the app to make a request. Here’s output:

You can check out the source code above example here: dio_tasker/03-02-headers-interceptor
Tutorial 3: Retry Interceptor:
- Let’s create a new file
lib/interceptors/retry_interceptor.dart:
import 'package:dio/dio.dart';

class RetryInterceptor extends Interceptor {
  final Dio dio;

  RetryInterceptor(this.dio);

  /// onError: This method is called when an error occurs.
  /// We check if the request should be retried using the _shouldRetry method. If it should, we retry the request.
  /// If the retry fails, we call super.onError to pass the error to the next handler. If no retry is needed, we also call super.onError.
  @override
  void onError(DioException err, ErrorInterceptorHandler handler) async {
    // Check if the request should be retried
    if (_shouldRetry(err)) {
      try {
        // Retry the request
        final response = await dio.request(
          err.requestOptions.path,
          options: Options(
            method: err.requestOptions.method,
            headers: err.requestOptions.headers,
          ),
        );

        // Resolve the response
        return handler.resolve(response);
      } catch (e) {
        // If the retry fails, pass the error to the next handler.
        return handler.next(err);
      }
    }
    // If no retry, pass the error to the next handler.
    super.onError(err, handler);
  }

  // Determine if the request should be retried.
  bool _shouldRetry(DioException exception) {
    return exception.type == DioExceptionType.connectionError ||
        exception.type == DioExceptionType.badResponse;
  }
}
Add the Interceptor to Dio:
Now, let’s modify the lib/services/api_service.dart to add the RetryInterceptor:
class ApiService {
  final Dio _dio;

  ApiService() : _dio = Dio() {
    // Add the logging interceptor
    _dio.interceptors.add(LoggingInterceptor());

    // Add the headers interceptor.
    _dio.interceptors.add(HeadersInterceptor());

    // Add the retry interceptor.
    _dio.interceptors.add(RetryInterceptor(_dio));
  }

  // Method to fetch tasks from the API
  Future<List<Task>> fetchTasks() async {
    try {
      // Make a GET request to fetch tasks
      final response =
          await _dio.get('https://jsonplaceholder.typicode.com/todos');
      // Parse the response data into a list of Task objects
      return (response.data as List)
          .map((task) => Task.fromJSON(task))
          .toList();
    } on DioException catch (dioException) {
      // Handle Dio Exceptions
      if (dioException.type == DioExceptionType.connectionTimeout) {
        throw Exception('Connection Timeout');
      } else if (dioException.type == DioExceptionType.receiveTimeout) {
        throw Exception('Receive Timeout');
      } else if (dioException.type == DioExceptionType.badResponse) {
        throw Exception(
            'Received invalid status code: ${dioException.response?.statusCode}');
      } else {
        throw Exception('Something went wrong');
      }
    } catch (e) {
      // Handle other errors
      throw Exception('Failed to load tasks');
    }
  }
}
Test the Interceptor:
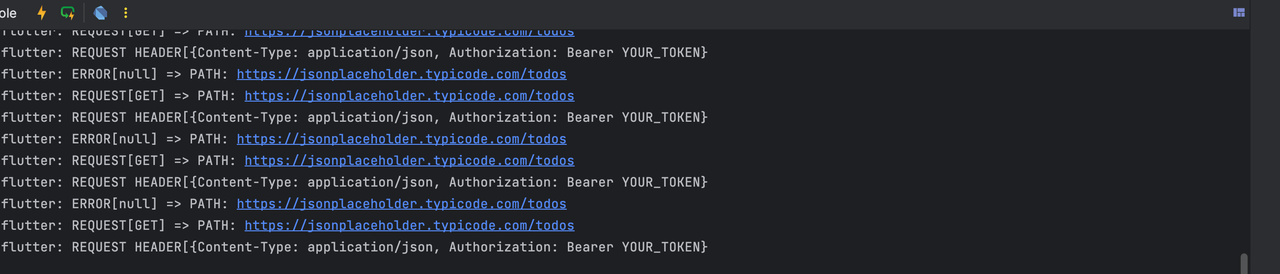
Finally, we can test if the retry method works. So, I turned off Network on my device and ran the app and this is the output:
Now, I just turned on the network again and here’s the output:
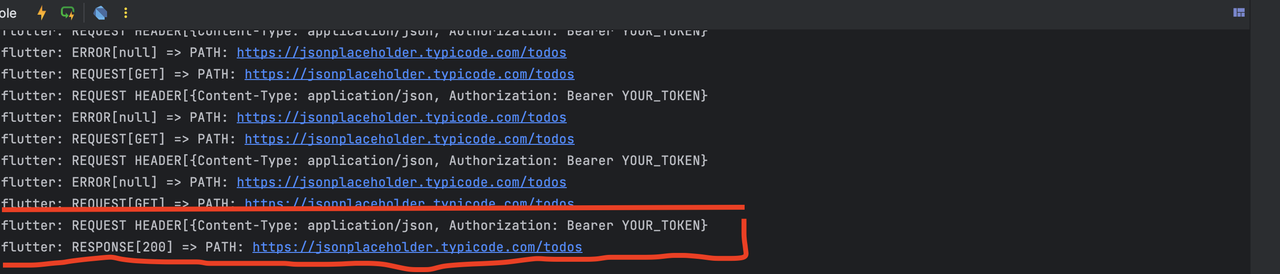
So, as you can see Dio keeps retrying until we get a successful response. You can find the source code above tutorial here: dio_tasker/03-03-retry-interceptor
Tutorial 4: Authentication Interceptor
Since we have covered Content type access header in Tutorial 2, let’s go over authentication headers.
Authentication Headers:
Authentication headers are HTTPS headers used to pass authentication information between the client and server. The most common authentication header is the Authorization header, which typically contains the token.
Example of an Authorization header:
Authorization: Bearer YOUR_ACCESS_TOKEN
On that note let’s understand Token-Based Authentication
What is Token-Based Authentication?
Token-Based Authentication is a mechanism where client (such as a mobile app or web browser) authenticates with a server using a token. This token is usually string of characters representing the user’s credentials and permissions. Tokens are typically issued by the server upon successful login and must be included in the subsequent requests to access protected resources.
How Token-Based Authentication Works
Login: The client sends a login request with the user’s credentials (username and password) to the server.
Token Issuance: If the credentials are valid, the server generates a token and sends it back to the client.
Token Storage: The client stores the token (usually in local storage or secure storage).
Authenticated Requests: For subsequent requests, the client includes the token in the request headers to authenticate the server.
Token Validation: The server validates the token and grants access to the requested resource if the token is valid.
Token Refresh: If the token expires, the client can request a new token using a refresh token.
So, on this note let’s look at Authentication Interceptor.
Tutorial 4: Creating an Authentication Interceptor:
Create an Authentication Interceptor:
- Let’s create a new file
lib/interceptors/auth_interceptor.dart
import 'package:dio/dio.dart';

class AuthInterceptor extends Interceptor {
  final Dio dio;

  AuthInterceptor(this.dio);

  /// onRequest: This method is called before a request is sent.
  /// We add the access token to the request headers.
  @override
  void onRequest(RequestOptions options, RequestInterceptorHandler handler) {
    // Add the access token to the headers.
    options.headers['Authorization'] = 'Bearer YOUR_ACCESS_TOKEN';
    super.onRequest(options, handler);
  }

  /// onError: This method is called when an error occurs.
  /// If the error status code is 401 (Unauthorized), we attempt to refresh the token and retry the request with the new token.
  @override
  void onError(DioException err, ErrorInterceptorHandler handler) async {
    if (err.response?.statusCode == 401) {
      // Handle token refresh logic.
      final newToken = await _refreshToken();
      if (newToken != null) {
        // Retry the request with the new token
        final options = err.requestOptions;
        options.headers['Authorization'] = 'Bearer $newToken';
        final response = await dio.request(
          options.path,
          options: Options(
            method: options.method,
            headers: options.headers,
          ),
        );
        return handler.resolve(response);
      }
    }
    super.onError(err, handler);
  }

  /// _refreshToken: This method should contain the logic to refresh the token.
  /// In a real application, you would make a request to your authentication server to get a new token.
  Future<String?> _refreshToken() async {
    return 'NEW_ACCESS_TOKEN';
  }
}
Add the interceptor to Dio:
import 'package:dio/dio.dart';
import 'package:dio_tasker/interceptors/auth_interceptor.dart';
import 'package:dio_tasker/interceptors/headers_interceptor.dart';
import 'package:dio_tasker/interceptors/logging_interceptor.dart';
import 'package:dio_tasker/interceptors/retry_interceptor.dart';

import '../models/tasks.dart';

class ApiService {
  final Dio _dio;

  ApiService() : _dio = Dio() {
    // Add the logging interceptor
    _dio.interceptors.add(LoggingInterceptor());

    // Add the headers interceptor.
    _dio.interceptors.add(HeadersInterceptor());

    // Add the retry interceptor.
    _dio.interceptors.add(RetryInterceptor(_dio));

    // Add the authentication interceptor.
    _dio.interceptors.add(AuthInterceptor(_dio));
  }

  // Method to fetch tasks from the API
  Future<List<Task>> fetchTasks() async {
    try {
      // Make a GET request to fetch tasks
      final response =
          await _dio.get('https://jsonplaceholder.typicode.com/todos');
      // Parse the response data into a list of Task objects
      return (response.data as List)
          .map((task) => Task.fromJSON(task))
          .toList();
    } on DioException catch (dioException) {
      // Handle Dio Exceptions
      if (dioException.type == DioExceptionType.connectionTimeout) {
        throw Exception('Connection Timeout');
      } else if (dioException.type == DioExceptionType.receiveTimeout) {
        throw Exception('Receive Timeout');
      } else if (dioException.type == DioExceptionType.badResponse) {
        throw Exception(
            'Received invalid status code: ${dioException.response?.statusCode}');
      } else {
        throw Exception('Something went wrong');
      }
    } catch (e) {
      // Handle other errors
      throw Exception('Failed to load tasks');
    }
  }
}
Test the Interceptor:
Let’s check if the token is added to the request headers thanks to our LogInterceptor.
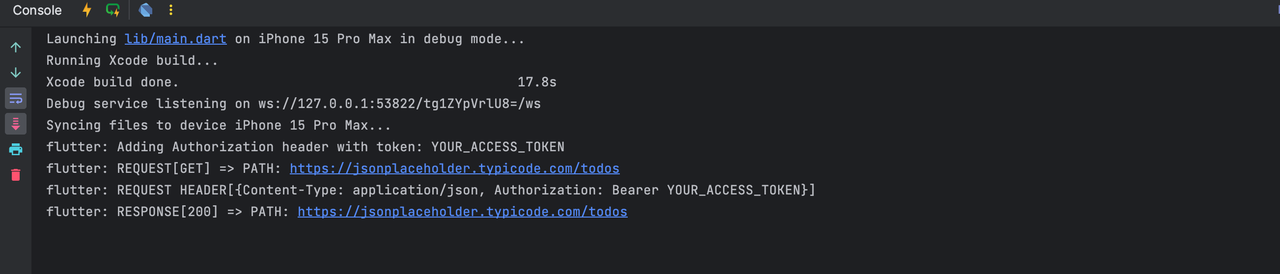
Perfect, as we can see, the header includes YOUR_ACCESS_TOKEN.
You can find the source code for above tutorial here: dio_tasker/03-04-auth-interceptor
Tutorial 5: Custom Error Handling Interceptor
Now, we’ll create an interceptor to handle custom error messages and show user-friendly messages.
Create a Custom Error Handling Interceptor:
- Create a new file
lib/interceptors/error_interceptor.dart
import 'package:dio/dio.dart';

class ErrorInterceptor extends Interceptor {

  /// onError: This method is called when an error occurs.
  /// We determine the type of error and set a user-friendly error message.
  /// The error message is then printed, and the error is passed to the next handler using super.onError.
  @override
  void onError(DioException err, ErrorInterceptorHandler handler) {
    String errorMessage;
    if (err.type == DioExceptionType.connectionTimeout) {
      errorMessage = 'Connection Timeout';
    } else if (err.type == DioExceptionType.receiveTimeout) {
      errorMessage = 'Receive Timeout';
    } else if (err.type == DioExceptionType.badResponse) {
      errorMessage =
          'Received invalid status code: ${err.response?.statusCode}';
    } else if (err.type == DioExceptionType.connectionError) {
      errorMessage = 'Connection Error';
    } else {
      errorMessage = 'Something went wrong';
    }
    // Show a user-friendly error message.
    print('Error: $errorMessage');
    // Pass the error to the next handler.
    super.onError(err, handler);
  }
}
Add the Interceptor to Dio:
import 'package:dio/dio.dart';
import 'package:dio_tasker/interceptors/auth_interceptor.dart';
import 'package:dio_tasker/interceptors/error_interceptor.dart';
import 'package:dio_tasker/interceptors/headers_interceptor.dart';
import 'package:dio_tasker/interceptors/logging_interceptor.dart';
import 'package:dio_tasker/interceptors/retry_interceptor.dart';

import '../models/tasks.dart';

class ApiService {
  final Dio _dio;

  ApiService() : _dio = Dio() {
    // Add the headers interceptor
    _dio.interceptors.add(HeadersInterceptor());

    // Add the authentication interceptor
    _dio.interceptors.add(AuthInterceptor(_dio));

    // Add the error interceptor.
    _dio.interceptors.add(ErrorInterceptor());

    // Add the logging interceptor last
    _dio.interceptors.add(LoggingInterceptor());
  }

  // Method to fetch tasks from the API
  Future<List<Task>> fetchTasks() async {
    try {
      // Make a GET request to fetch tasks
      final response =
          await _dio.get('https://jsonplaceholder.typicode.com/todos');
      // Parse the response data into a list of Task objects
      return (response.data as List)
          .map((task) => Task.fromJSON(task))
          .toList();
    } on DioException catch (dioException) {
      // Handle Dio Exceptions
      if (dioException.type == DioExceptionType.connectionTimeout) {
        throw Exception('Connection Timeout');
      } else if (dioException.type == DioExceptionType.receiveTimeout) {
        throw Exception('Receive Timeout');
      } else if (dioException.type == DioExceptionType.badResponse) {
        throw Exception(
            'Received invalid status code: ${dioException.response?.statusCode}');
      } else {
        throw Exception('Something went wrong');
      }
    } catch (e) {
      // Handle other errors
      throw Exception('Failed to load tasks');
    }
  }
}
Test the interceptor:
Finally let’s test the interceptor to see if our app can handle the error messages:
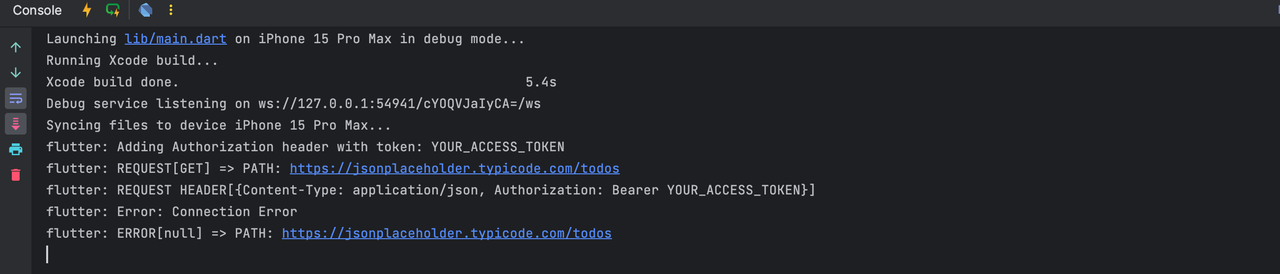
When I turned off the network, we can see the Error: Connection Error, in our console.
You can find the source code for the above tutorial here: dio_tasker/03-05-error-interceptor
Conclusion:
In this series of tutorials, we’ve gone through interceptors in Dio comprehensively. We are going to take a look at other parts of Dio in future articles. But until then have fun and happy coding 🐦
Comments
Join the discussionNo comments yet. Be the first to comment.