How to use Platform Channels in Flutter
Platform channels in Flutter uses a flexible system that allows us to call platform-specific APIs in a language that works directly with those APIs:
Kotlin or Java on Android
Swift or Objective-C on iOS
C++ on Windows
Objective-C on macOS
C on Linux
Flutter's builtin platform-specific API support doesn't rely on code generation, but rather on a flexible message passing style
This is the way it works:
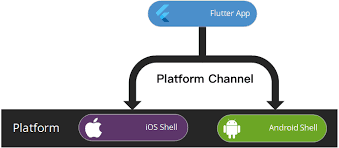
The Flutter portion of the app sends messages to its host, the non-Dart portion of the app, over a platform channel.
The host listens on the platform channel, and receives the message. It then calls into any number of platform-specific APIs—using the native programming language—and sends a response back to the client, the Flutter portion of the app.
Platform Channels Architecture:
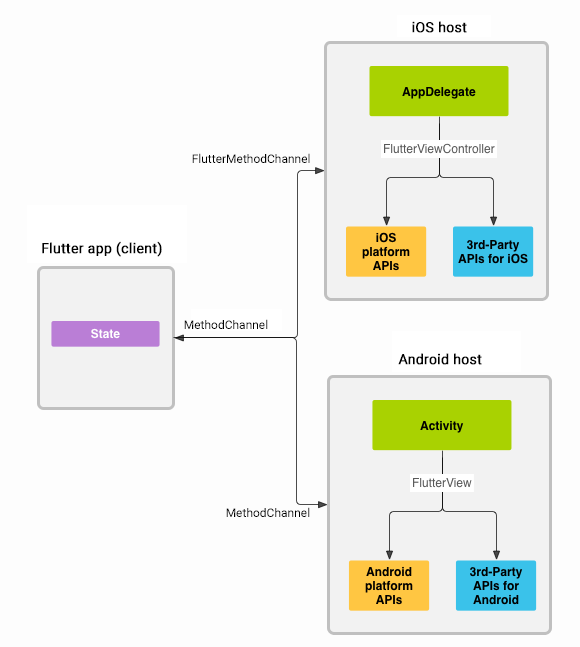
Observations from the architecture: - On Flutter side MethodChannel enables sending messages that correspond to method calls. - On the platform side, MethodChannel on Android MethodChannelAndroid and FlutterMethodChannel on iOS MethodChanneliOS enable receiving method calls and sending back a result. These classes allow you to develop a platform plugin with very little 'boilerplate' code.
Getting Battery Life of the device using Platform Channels
Let's create an app that gets Battery life of the device. We are going to implement it in all the platforms. Here are the platforms along with their associated APIs.
| Platform | API |
| Android | BatteryManager |
| iOS | device.batteryLevel |
| Windows | GetSystemPowerStatus |
| Linux | UPower |
We are going to call all of this with a Single Platform Message: getBatteryLevel() |
For now we'll stick with Android and iOS
Source Code:
You can find the source code here: battery_level_tutorial
Step 1: Create a new App
In terminal run the following: flutter create battery_level_tutorial
Step 2: Create the Flutter Platform Client
As we know the app's State class holds the current app state. So let's extend that to hold the current battery state.
First, construct the channel: In order to do that we need to define a single method called MethodChannel() that returns the battery level.
The client and host sides of a channel are connected through a channel name passed in the constructor. All channel names used in a single app must be unique; So we just have to prefix the channel name with a unique domain prefix.
Our Channel Name: For example, let's say our channel name is battery so our domain prefix would be. com.harishkunchala so our total channel name is com.harishkunchala/battery
Current Imports:
Remember platform values are going to be always either async or streams.
Since we are going to call our battery percentage through a trigger like clicking a button. It is async value. Hence here are our imports:
import 'dart:async'; // As battery value is async
import 'package:flutter/material.dart';
import 'package:flutter/services.dart'; // For calling method channel
Initialize our Method Channel:
- We can initialize our method channel in the
HomePageclass like this:
class _MyHomePageState extends State<MyHomePage> {

static const platform = MethodChannel('com.harishkunchala/battery');
....
Next, invoke a method on the method channel, specifying the concrete method to call using the
StringidentifiergetBatteryLevel.The call might fail—for example, if the platform doesn't support the platform API (such as when running in a simulator), so wrap the
invokeMethodcall in a try-catch statement.
// Get Battery Level
  String _batteryLevel = 'Unknown battery level.';

  Future<void> _getBatteryLevel() async {
    String batteryLevel;

    try {
      final result = await platform.invokeMethod<int>('getBatteryLevel');
      batteryLevel = 'Battery level at $result %';
    } on PlatformException catch (e) {
      batteryLevel = "Failed to get battery level: '${e.message}'.";
    }

    setState(() {
      _batteryLevel = batteryLevel;
    });
  }
Update the build method: We'll create a simple UI with a basic column with a button and text to show the battery percentage.
Widget build(BuildContext context) {
    return Scaffold(
      body: Center(
        child: Column(
          children: [
            ElevatedButton(
                onPressed: _getBatteryLevel,
                child: const Text('Get Battery Level')),
            const SizedBox(height: 20),
            Text(_batteryLevel),
          ],
        ),
      ),
    );
  }
Step 3: Add an Android Specific Implementation:
First open
android/folder in Android Studio.Navigate to Kotlin folder and open
MainActivity.ktInside our MainActivity define a String variable
CHANNELand set it to exactly what we used in our flutter:
private val CHANNEL = "com.harishkunchala/battery";
- Also override
configureFlutterEnginemethod and create aMethodChanneland callsetMethodCallHandler(). Here's the entire code:
package com.example.battery_level_tutorial

import io.flutter.embedding.android.FlutterActivity
import io.flutter.embedding.engine.FlutterEngine
import io.flutter.plugin.common.MethodChannel

class MainActivity: FlutterActivity() {
    private  val CHANNEL = "com.harishkunchala/battery"

    override fun configureFlutterEngine(flutterEngine: FlutterEngine) {
        super.configureFlutterEngine(flutterEngine)
        MethodChannel(flutterEngine.dartExecutor.binaryMessenger, CHANNEL).setMethodCallHandler{
            call, result ->
            // This method is invoked on the main thread
            // TODO
        }
    }
}
Add the Android Kotlin code that uses the Android battery APIs to retrieve the battery level. This code is exactly the same as you would write in a native Android app.
First let's add the needed imports at the top of the file:
import android.content.Context
import android.os.BatteryManager
- Now add the following method below in the
MainActivityclass belowconfigureFlutterEngine()method:
private fun getBatteryLevel(): Int {
    val batteryLevel: Int
    val batteryManager = getSystemService(Context.BATTERY_SERVICE) as BatteryManager
    batteryLevel = batteryManager.getIntProperty(BatteryManager.BATTERY_PROPERTY_CAPACITY)

    return batteryLevel
}
Call setMethodCallHandler():
We need to handle a single platform method,
getBatteryLevel()so let's test for that in the call argument.
The implementation of this platform method calls the Android code written in the previous step.
It returns a response for both the success and error cases using the
resultargument.If an unknown method is called, report that instead
So here's our final MethodChannle():
MethodChannel(flutterEngine.dartExecutor.binaryMessenger, CHANNEL).setMethodCallHandler {
    // This method is invoked in the main thread
        call, result ->
    if (call.method == "getBatteryLevel") {
        val batteryLevel = getBatteryLevel()

        if (batteryLevel != -1) {
            result.success(batteryLevel)
        } else {
            result.error("UNAVAILABLE", "Battery level not available", null)
        }
    } else {
        result.notImplemented()
    }
}
Step 4: Add an iOS platform-specific implementation
Start by opening the iOS host portion of your Flutter app in Xcode:
Start Xcode.
Select the menu item File > Open....
Navigate to the directory holding your Flutter app, and select the ios folder inside it. Click OK.
Add support for Swift in the standard template setup that uses Objective-C:
Expand Runner > Runner in the Project navigator.
Open the file
AppDelegate.swiftlocated under Runner > Runner in the Project navigator.
Steps:
- Override the
application:didFinishLaunchingWithOptions:function and create aFlutterMethodChanneltied to the channel namecom.harishkunchala/battery:
import Flutter
import UIKit

@UIApplicationMain
@objc class AppDelegate: FlutterAppDelegate {
  override func application(
    _ application: UIApplication,
    didFinishLaunchingWithOptions launchOptions: [UIApplication.LaunchOptionsKey: Any]?) -> Bool {

    let controller : FlutterViewController = window?.rootViewController as! FlutterViewController
    let batteryChannel = FlutterMethodChannel(name: "com.harishkunchala/battery",
                                              binaryMessenger: controller.binaryMessenger)
    batteryChannel.setMethodCallHandler({
      (call: FlutterMethodCall, result: @escaping FlutterResult) -> Void in
      // This method is invoked on the UI thread.
      // Handle battery messages.
    })

    GeneratedPluginRegistrant.register(with: self)
    return super.application(application, didFinishLaunchingWithOptions: launchOptions)
  }
}
- Next let's create a method
receiveBatteryLevel()that's retrieve iOS battery level. So add the following code at the bottom ofAppDelegate.swift
private func receiveBatteryLevel(result: FlutterResult) {
    let device = UIDevice.current
    device.isBatteryMonitoringEnabled = true
    if device.batteryState == UIDevice.BatteryState.unknown {
        result(FlutterError(code: "UNAVAILABLE", message: "Battery level not available.", details: nil))
    } else {
        result(Int(device.batteryLevel * 100))
    }
}
Finally complete the
setMethodCallHandler()method added earlier.We need to handle a single platform method
getBatteryLevel(), so test for that in thecallargument.The implementation of this platform method calls the iOS code written in the previous step. If an unknown method is called, report that instead:
batteryChannel.setMethodCallHandler({
      (call: FlutterMethodCall, result: @escaping FlutterResult) -> Void in
      // This method is invoked on the UI thread.
        guard call.method == "getBatterLevel" else {
            result(FlutterMethodNotImplemented)
            return
        }
        self?.receiveBatteryLevel(result: result)
    })
You should now be able to run the app on iOS. Note: If you are using iOS simulator, it doesn't support battery APIs, and the app displays 'Battery level not available'.
Testing the code:
Perfect, for now let's test it on an actual Android device. Here's the output:

Finally our app is working perfectly. You can find the entire source code for the app here: battery_level_tutorial
Happy Coding 🐦