The Ultimate Guide to GoRouter: Navigation in Flutter Apps Part -2 (Nested Routers, Redirect, Guard, Error Handling)

You can find the Part 1 here: https://tinyurl.com/k3f64hwv
Dashboard Page - Nested Routes
Example 1: Tabbed Content with Widgets
Nested routes are useful for organizing complex user interfaces with multiple layers of navigation, such as a dashboard with multiple sections, each represented as a tab or a sub-page. This approach helps maintain a clean and manageable structure in your routing setup.
Step 1: Define the DashboardPage Widget
Let's create our DashboardPage with three tabs: Home, Settings, and Profile. Each tab will represent a nested route.
import 'package:flutter/material.dart';

class DashboardPage extends StatelessWidget {
  const DashboardPage({Key? key}) : super(key: key);

  @override
  Widget build(BuildContext context) {
    return DefaultTabController(
      length: 3,
      child: Scaffold(
        appBar: AppBar(
          title: const Text('Dashboard'),
          bottom: const TabBar(
            tabs: [
              Tab(icon: Icon(Icons.home), text: 'Home'),
              Tab(icon: Icon(Icons.settings), text: 'Settings'),
              Tab(icon: Icon(Icons.account_circle), text: 'Profile'),
            ],
          ),
        ),
        body: const TabBarView(
          children: [
            Center(child: Text('Home Tab Content')),
            Center(child: Text('Settings Tab Content')),
            Center(child: Text('Profile Tab Content')),
          ],
        ),
      ),
    );
  }
}
Step 2: Configure Nested Routes in AppRouter
Now, let's set up the routes in the AppRouter. Although the above DashboardPage uses DefaultTabController for simplicity, nested routes in GoRouter would involve setting up child routes under a parent route.
GoRoute(
          path: '/dashboard',
          builder: (BuildContext context, GoRouterState state) =>
              const DashboardPage(),
          routes: [
            GoRoute(
              path: 'home',
              builder: (BuildContext context, GoRouterState state) =>
                  const Center(child: Text("Home Tab Content")),
            ),
            GoRoute(
              path: 'settings',
              builder: (BuildContext context, GoRouterState state) =>
                  const Center(child: Text("Settings Tab Content")),
            ),
            GoRoute(
              path: 'profile',
              builder: (BuildContext context, GoRouterState state) =>
                  const Center(child: Text("Profile Tab Content")),
            ),
          ]),
Explanation
Parent Route (
/dashboard): This is the main dashboard page.Nested Routes: Under the dashboard, we have three sub-routes (
home,settings,profile). Each of these could potentially be fleshed out with more complex functionality or screens.
Step 3: Testing the Setup
To test this setup:
Let's create an
ElevatedButtonon HomePage to go toDashboardClick on the tabs and observe that the content changes according to the selected tab.
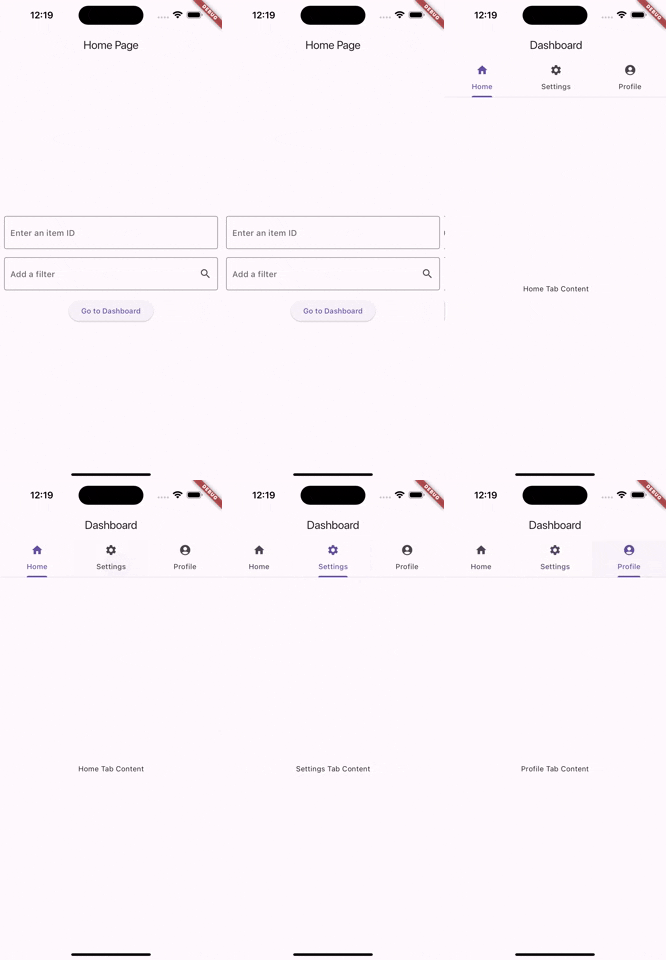
- We can also directly navigate to
/dashboard/home,/dashboard/settings, or/dashboard/profileto see if the respective content is shown.
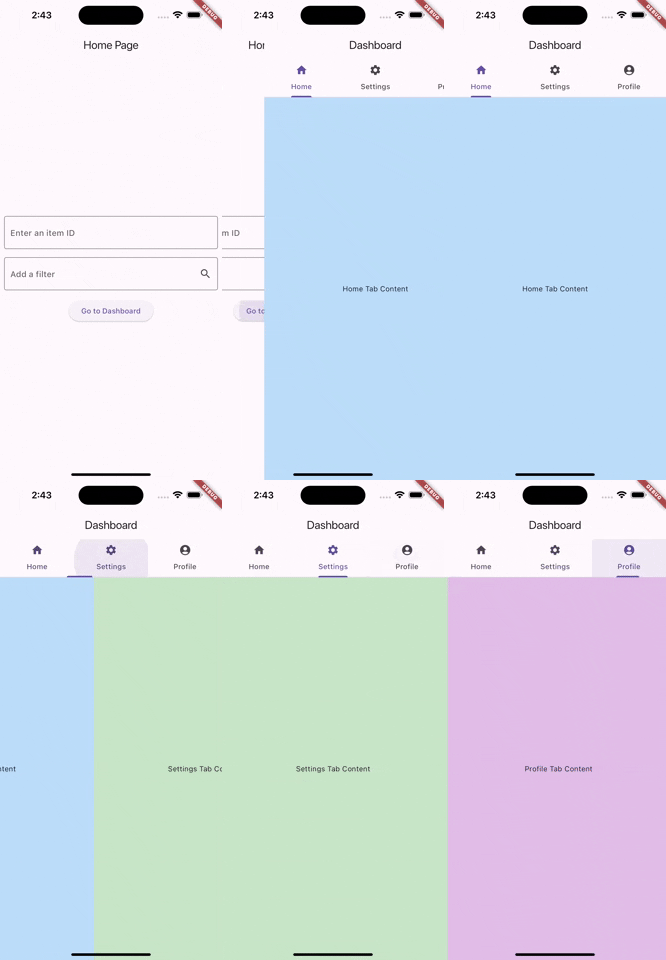
Example 2: Tabbed Content with Actual Screens
So let's create an all the screens to be put in the tabs. I am going to go with basic UI but if you want you can additional features inside each screen too.
Step 1: Create Specific Screens for Each Tab
First, let's define separate widgets for each tab to be used in the nested routes:
import 'package:flutter/material.dart';

// HomeTabScreen with a unique background color
class HomeTabScreen extends StatelessWidget {
  const HomeTabScreen({super.key});

  @override
  Widget build(BuildContext context) {
    return Container(
      color: Colors.blue[100], // Light blue background
      child: const Center(child: Text('Home Tab Content')),
    );
  }
}

// SettingsTabScreen with a unique background color
class SettingsTabScreen extends StatelessWidget {
  const SettingsTabScreen({super.key});

  @override
  Widget build(BuildContext context) {
    return Container(
      color: Colors.green[100], // Light green background
      child: const Center(child: Text('Settings Tab Content')),
    );
  }
}

// ProfileTabScreen with a unique background color
class ProfileTabScreen extends StatelessWidget {
  const ProfileTabScreen({super.key});

  @override
  Widget build(BuildContext context) {
    return Container(
      color: Colors.purple[100], // Light purple background
      child: const Center(child: Text('Profile Tab Content')),
    );
  }
}
Step 2: Update theDashboardPage to Include Specific Screens
Modify the DashboardPage to use these new widgets within the TabBarView:
class DashboardPage extends StatelessWidget {
  const DashboardPage({super.key});

  @override
  Widget build(BuildContext context) {
    return DefaultTabController(
      length: 3,
      child: Scaffold(
        appBar: AppBar(
          title: const Text("Dashboard"),
          bottom: const TabBar(
            tabs: [
              Tab(icon: Icon(Icons.home), text: "Home"),
              Tab(icon: Icon(Icons.settings), text: "Settings"),
              Tab(icon: Icon(Icons.account_circle), text: "Profile"),
            ],
          ),
        ),
        body: const TabBarView(
          children: [
            HomeTabScreen(),
            SettingsTabScreen(),
            ProfileTabScreen(),
          ],
        ),
      ),
    );
  }
}
Step 3: Integrate with GoRouter
Now, integrate these screens into your GoRouter setup. Since we want to use GoRouter to handle the actual switching between tabs based on the route (rather than just using DefaultTabController), so let's set up child routes:
 GoRoute(
          path: '/dashboard',
          builder: (BuildContext context, GoRouterState state) =>
              const DashboardPage(),
          routes: [
            GoRoute(
              path: 'home',
              builder: (BuildContext context, GoRouterState state) =>
                  const HomeTabScreen(),
            ),
            GoRoute(
              path: 'settings',
              builder: (BuildContext context, GoRouterState state) =>
                  const SettingsTabScreen(),
            ),
            GoRoute(
              path: 'profile',
              builder: (BuildContext context, GoRouterState state) =>
                  const ProfileTabScreen(),
            ),
          ])
Step 4: Testing the Setup
Run your application:
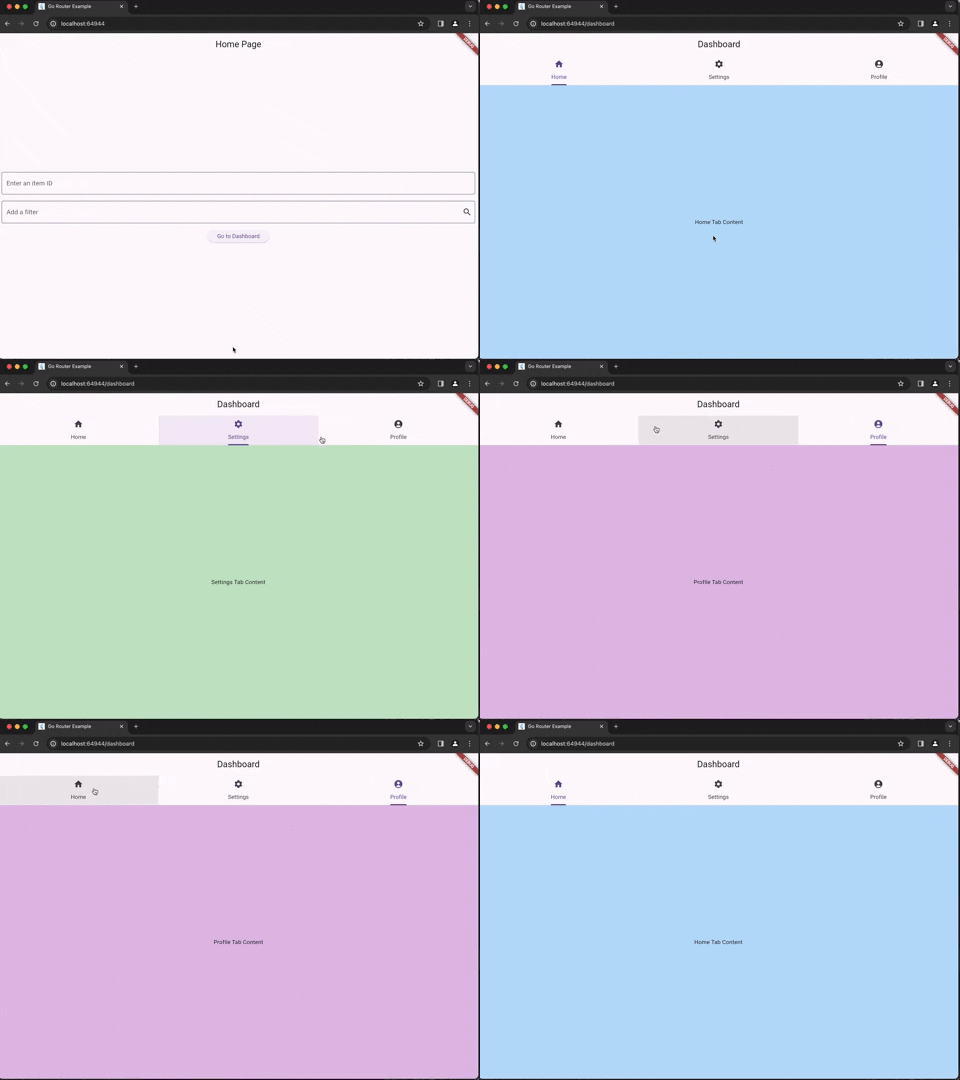
You can find the entire source code for nested routes here: https://github.com/khkred/flutter_comp_go_router/tree/nested_routes
Concept: Redirection and Guards
Guards in GoRouter allow you to perform checks before a route is shown to the user.
If the check fails, you can redirect the user to another route, typically used for scenarios like redirecting unauthenticated users to a login page.
Example Scenario
Let's implement a simple authentication check where users need to be logged in to view the DashboardPage. If they are not authenticated, they will be redirected to a LoginPage.
Step 1: Define the LoginPage
First, let’s create a LoginPage that provides an option to "log in" for simplicity.
import 'package:flutter/material.dart';
import 'package:go_router/go_router.dart';

class LoginPage extends StatelessWidget {
  const LoginPage({super.key});
  @override
  Widget build(BuildContext context) {
    return Scaffold(
      appBar: AppBar(title: const Text("Login Page")),
      body: Center(
        child: Column(
          mainAxisAlignment: MainAxisAlignment.center,
          children: <Widget>[
            const Text('Please log in to continue'),
            const SizedBox(height: 20),
            ElevatedButton(
              onPressed: () {
                //Simulate a login by setting a logged in flag
                context.go('/dashboard');
              },
              child: const Text('Log In'),
            ),
          ],
        ),
      ),
    );
  }
}
Step 2: Setup Authentication Guard
Let’s define a simple mechanism to check if a user is logged in. For demonstration, we'll use a global variable (Note: In production, you should use a more secure method, such as a state management solution or secure storage, which we'll see in later lessons when we use Riverpod).
Since this is a global variable. For now let's declare it in a global.dart file
bool isLoggedIn = false; // This will be our simple auth check
Now let's add a guard to the AppRouter:
 GoRoute(
        path: '/login',
        builder: (BuildContext context, GoRouterState state) =>
            const LoginPage(),
      ),

      GoRoute(
          path: '/dashboard',
          builder: (BuildContext context, GoRouterState state) =>
              const DashboardPage(),
          redirect: (BuildContext context, GoRouterState state) {
            if (!isLoggedIn) {
              return '/login'; // Redirect to login if not authenticated
            }
            return null; // No redirection if authenticated
          },
Now let's run the code (Remember Right now isLoggedIn = false )
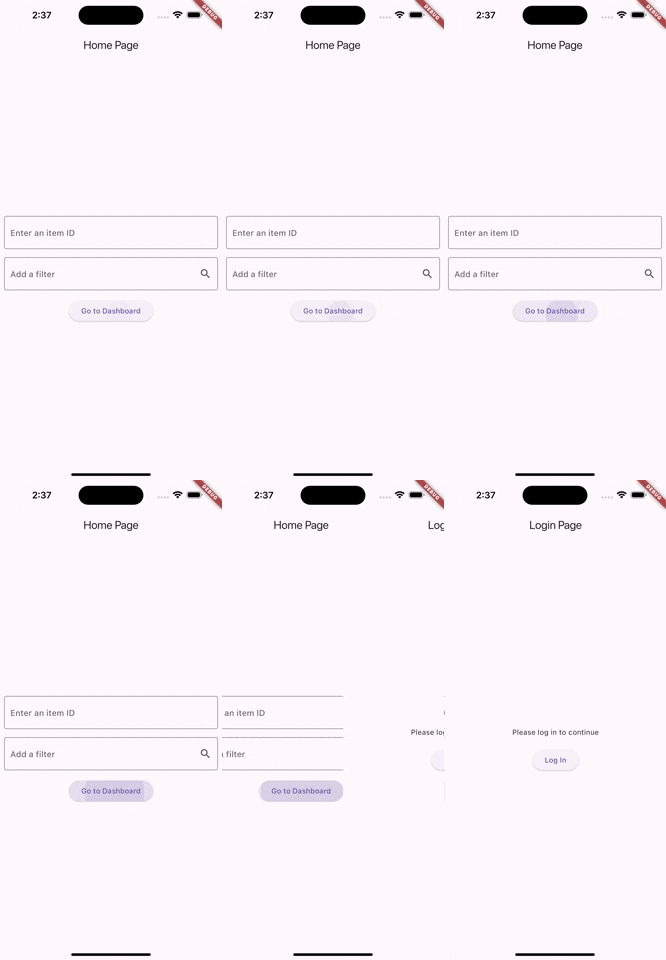
Now let's set isLoggedIn = true and then run the app
You can find the source code for Redirection and Guards here: https://github.com/khkred/flutter_comp_go_router/tree/redirection_and_guards
Concept: Error Handling
GoRouter allows us to define a custom error page that can be shown when no matching routes are found or when an exception occurs during navigation. This is crucial for preventing users from encountering raw error messages and instead provides them with helpful information or actions they can take.
Step 1: Define an ErrorPage
Let's create an ErrorPage that will display error information. This page will show a message and provide an option to navigate back to a safe place like the home page.
import 'package:flutter/material.dart';
import 'package:go_router/go_router.dart';

class ErrorPage extends StatelessWidget {
  final String? error;

  const ErrorPage({super.key, this.error});

  @override
  Widget build(BuildContext context) {
    return Scaffold(
      appBar: AppBar(title: const Text('Error')),
      body: Center(
        child: Column(
          mainAxisAlignment: MainAxisAlignment.center,
          children: [
            Text(error ?? 'Something went wrong!', style: const TextStyle(color: Colors.red, fontSize: 18)),
            const SizedBox(height: 20),
            ElevatedButton(
              onPressed: () {
                context.go('/'); // Navigate back to the home page
              },
              child: const Text('Go Home'),
            ),
          ],
        ),
      ),
    );
  }
}
Step 2: Integrate Error Handling in AppRouter
Now, integrate this ErrorPage into your AppRouter to handle any route errors. You'll set up a global error builder that GoRouter will call whenever navigation to a route fails.
static final GoRouter router = GoRouter(
    errorBuilder: (BuildContext context,
GoRouterState state) => ErrorPage(
      error: state.error?.toString(),
    ),
    routes: [...]
);
Explanation:
Error Builder: The
errorBuilderis a callback that gets triggered whenever there is a navigation error. It receives the error state, which includes details about what went wrong.Usage of ErrorPage: The
ErrorPageis used to display the error. If there's a specific error message available from the navigation attempt, it displays that message; otherwise, it shows a generic "Something went wrong!" message.
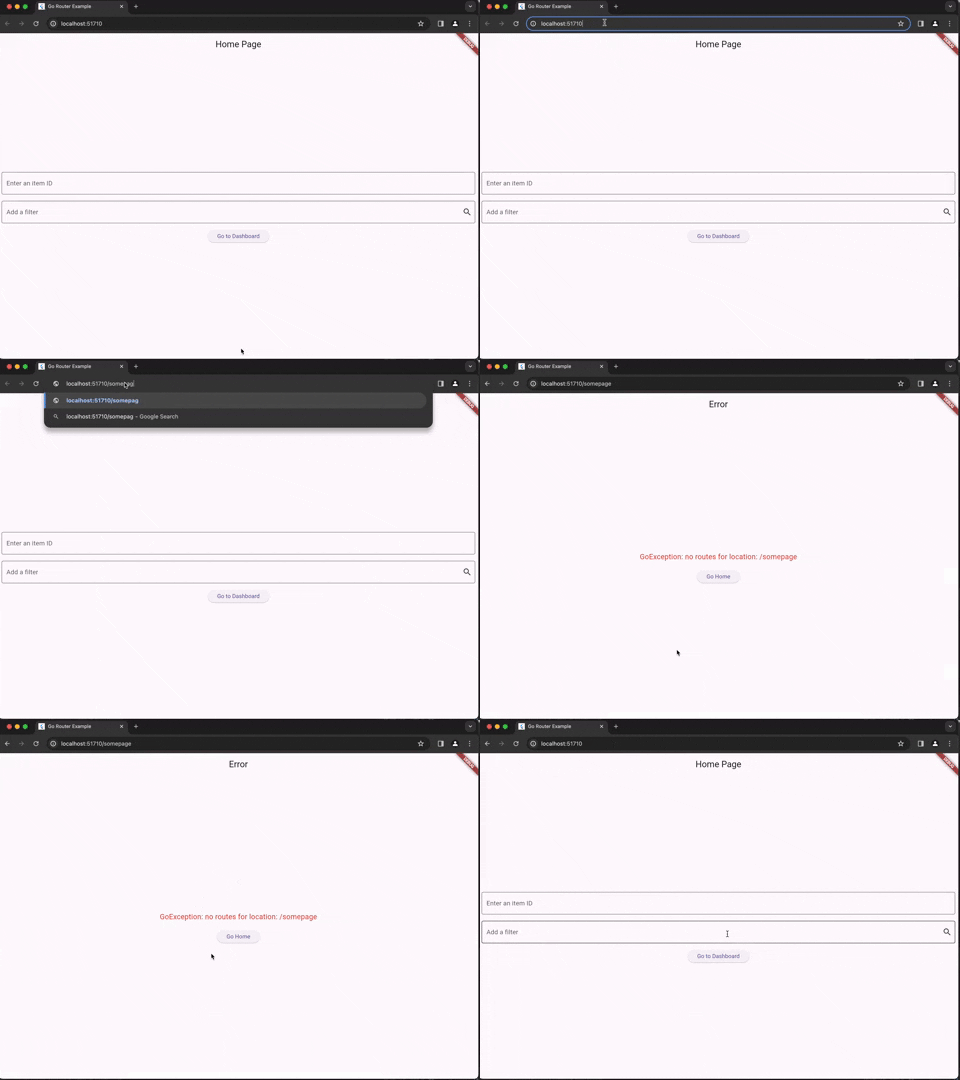
Step 3: Testing the Setup
To effectively test error handling:
Intentionally Navigate to a Non-Existent Route: Try navigating to a route that does not exist in your app, such as
/thisdoesnotexist.Check the Error Page: Verify that the
ErrorPageis displayed, and it provides the appropriate error message or a generic message.Use the Button: Click on the "Go Home" button to ensure it navigates back to the home page correctly.
You can find the source code for Error Handling here: https://github.com/khkred/flutter_comp_go_router/tree/error_handling
Thanks a lot for reading. Good Luck with your Flutter Journey.