Flutter Riverpod Tutorial Part 6: Riverpod Scopes and Overriding Providers

In this tutorial, we'll explore the use of ProviderScope for creating isolated sections in your app and learn how to override providers for different configurations and testing. We'll also look at practical examples to illustrate these concepts.
Sections Covered:
Using
ProviderScopefor Isolated SectionsOverriding Providers
Practical Examples
Section 1: Using ProviderScope for Isolated Sections
ProviderScope is used to create a scope within which providers can be accessed and managed.
This allows for creating isolated sections in your app where specific providers can be overridden or reset without affecting the rest of the app.
Here's our code :
import 'package:flutter/material.dart';
import 'package:hooks_riverpod/hooks_riverpod.dart';


//Let's define a simple counterProvider
final counterProvider = StateProvider<int>((ref) => 0);

void main() {
  runApp(
     const ProviderScope(child: MyApp()),
  );
}

class MyApp extends StatelessWidget {
  const MyApp({super.key});

  @override
  Widget build(BuildContext context) {
    return MaterialApp(
      darkTheme: ThemeData.dark(),
      themeMode: ThemeMode.dark,
      debugShowCheckedModeBanner: false,
      home: const HomePage(),
    );
  }
}

class HomePage extends StatelessWidget {
  const HomePage({super.key});

  @override
  Widget build(BuildContext context) {
    return  Scaffold(
      appBar: AppBar(title: const Text('Riverpod ProviderScope Example'),
      ),
      body: SizedBox(width: double.infinity,
      child: Column(
        mainAxisAlignment: MainAxisAlignment.center,
        children: [
          const ProviderScope(child: CounterWidget()),
          ProviderScope(
              overrides: [counterProvider.overrideWith((ref) => 100)],
              child: const CounterWidget()),
        ],
      ),),
    );
  }
}

class CounterWidget extends HookConsumerWidget {
  const CounterWidget({super.key});

  @override
  Widget build(BuildContext context, WidgetRef ref) {

    final counter = ref.watch(counterProvider);
    return Column(
      children: [
        Text('Value: $counter',
        style: const TextStyle(fontWeight: FontWeight.bold,
        fontSize: 24),),

        ElevatedButton(onPressed: (){
          ref.read(counterProvider.notifier).state++;
        }, child: const Text('Increment'),)
      ],
    );
  }
}
So these are the two things we used in the above code:
ProviderScope: Creates an isolated scope for providers.
overrides: Allows you to override providers within the scope.
You can find the source code here: ProviderScope Override
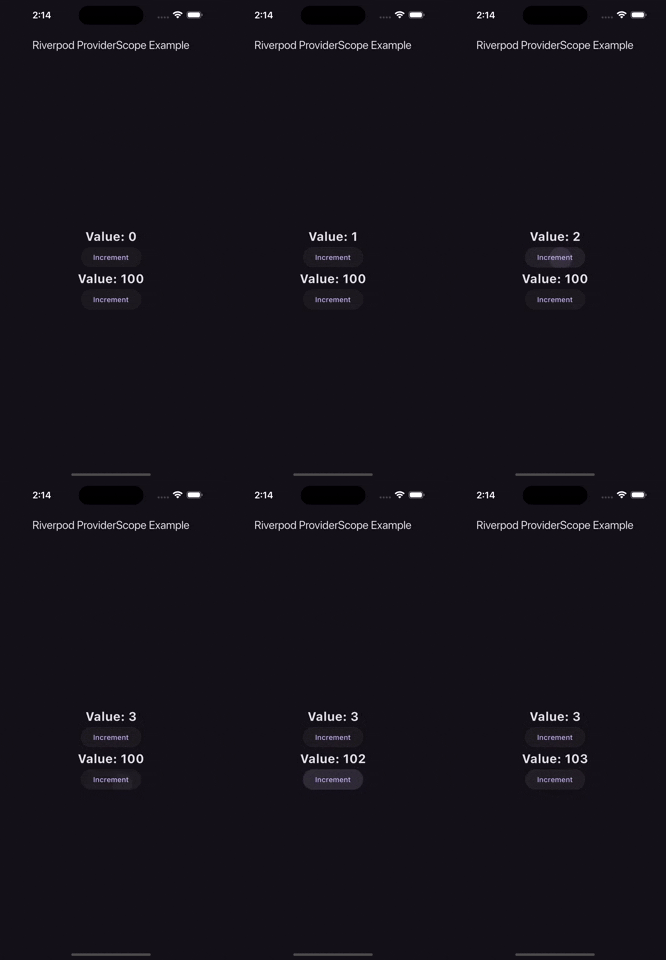
And as you can see the app works perfectly with different values
You can see the output here:
Section 2: Overriding Providers
Overriding providers is useful for testing or when you need different configurations for specific parts of your app.
You can override providers by using the overrides parameter in ProviderScope.
import 'package:flutter/material.dart';
import 'package:hooks_riverpod/hooks_riverpod.dart';

void main() {
  runApp(
    const ProviderScope(child: MyApp()),
  );
}

class MyApp extends StatelessWidget {
  const MyApp({super.key});

  @override
  Widget build(BuildContext context) {
    return MaterialApp(
      darkTheme: ThemeData.dark(),
      themeMode: ThemeMode.dark,
      debugShowCheckedModeBanner: false,
      home: const HomePage(),
    );
  }
}

class HomePage extends StatelessWidget {
  const HomePage({super.key});

  @override
  Widget build(BuildContext context) {
    return  Scaffold(
      appBar: AppBar(title: const Text('Overriding Providers Example'),
      ),
      body: Column(
        children: [
          const ProviderScope(child: GreetingWidget()),
          ProviderScope(
              overrides: [greetingProvider.overrideWithValue('Hello Riverpod')],
              child: const GreetingWidget()),
        ],
      ),
    );
  }
}

final greetingProvider = Provider<String>((ref) => 'Hello Word!!');

class GreetingWidget extends HookConsumerWidget {
  const GreetingWidget({super.key});

  @override
  Widget build(BuildContext context, WidgetRef ref) {
    final greeting = ref.watch(greetingProvider);

    return Padding(
      padding: const EdgeInsets.all(16.0),
      child: Text(
        greeting,
        style: const TextStyle(fontSize: 24),
      ),
    );
  }
}
You can find the source code here: Overriding
Use cases for the Overriding:
Isolated configurations
Overriding for Testing
Comments
Join the discussionNo comments yet. Be the first to comment.
Flutter Riverpod Tutorial
In this series, I'll cover every concept of Riverpod in a comprehensive manner, so that any user can understand total ins and outs of any Riverpod concept.