Step-by-Step Guide to Setting Up Firebase Phone Authentication in Flutter for Android and iOS (APNs, Push Notification and Xcode Setup)

Setting up Phone Verification allows various forms of User Credentials.
Let's see how to setup it up. Also make sure that the app is already connected to the firebase. You can read the following article on how to setup Firebase on your app : Flutter on Fire
Step 1: Add Phone Provider to Firebase
1.1 Go to Firebase Console

1.2 Navigate to your Project
In our scenario, we'll be selecting kaida:

1.3 Select Authentication from the sidebar

1.4 Go to Sign-in method tab.

1.5 Enable the Phone sign-in and save

This is my final sign-in methods:

Step 2: Configure Android for Phone Verification setup
Setup SHA-1 has in Firebase Console:

If you want to learn how to generate SHA-1 and SHA-256 for our app. Make sure to check out the following link: Registering Android App Checkout Step 5 inside the link.
Step 3: Configure iOS for Phone Verification Setup
Open Xcode:
First open the app in Xcode by clicking on iOS folder and then selecting "Open in Xcode" (Similar options on both VSCode as well as Android Studio).

Setup URL Types:
Go to the info tab and click on URL Types

We need couple of url Types:
- Reverse Client Id:
You can find it under our Runner in GoogleService-Info File:

So let's go ahead and add our Reverse Client Id. Just copy the value and then create an object in URL types:

- Encoded App ID:
The next step is to copy the Encoded App ID. We can find it on our Firebase Project Settings:
We are using Encode App ID for reCAPTCHA verification

Now we just have to past the value in our URL Types:

- Bundle ID:
Finally we just have to paste the bundle ID. we can get the Bundle ID from the general tab:

Let's paste it in the URL Types:

Perfect, now with the URL Types added. Let's add APNs and other things to avoid Captcha in real devices.
APN Keys:
Download APN Key
In order for the OTP to work without Captcha. We need to upload our APN key to our Firebase Project.
So first let's go to our Apple Developer Member Center and the go ahead and click on Keys:

Keys Page:

Click on Create a Key.
And then enable Apple Push Notification Service

After you click continue. You are taken to the new key registration page and just click on register.

Make sure to download your key and store it in a secure place. As it cannot be redownloaded again.

Upload APN Key to Firebase console:
Now that the key has been downloaded. Let's upload it to Firebase console.
Push Notifications:
- Inside your project in the Firebase console, select the gear icon, select Project Settings, and then select the Cloud Messaging tab.

Make sure to enter the Key ID as well as the Team ID when you upload the APN key:

Perfect now we can finally see our APN key in our Firebase console

Push Notifications:
Before our app can start to receive messages. We must explicitly enable "Push Notifications" and "Background Modes" within Xcode
Open our iOS module in Xcode:
You can do it in Android Studio by clicking on iOS module and then from the menu (Tools --> Flutter --> open iOS / macOS module in Xcode)

So we get Xcode:

Xcode Settings:
So follow the steps below:
Select Project
Select the Project target.
Select the "Signing & Capabilities" tab.

Enable Push Notifications
Next the "Push Notifications" capability needs to be added to the project. This can be done via the "Capability" option on the "Signing & Capabilities" tab:
Click on the "+ Capabilities" button.
Search for "Push Notifications"

Once selected, the capability will be shown below the other enabled capabilities. If no option appears when searching, the capability may already be enabled.

Enable Background Modes
Next the "Background Modes" capability needs to be enabled, along with "Background fetch" and "Remote notifications" sub-modes. This can be again added via the "Capability" option on the "Signing & Capabilities: tab:
Click on the "+ Capabilities" button.
Search for "Background Modes".

Once selected we can see the "Background Modes" with other capabilities too.
Now ensure that both the "Background fetch" and the "Remote notifications" sub-modes are enabled:

If you want, you can enable Background processing too.
Implementing Phone Number Verification
Add Phone Authentication Dependency
While we have already added it to our Kaida before. Let's make sure to get the latest version into our app.
flutter pub add firebase_auth
Implement Phone Verification Method in AuthRepository
AuthRepository:
I have created an AuthRepository in Kaida. So we are going to add this to our AuthRepository
import 'package:firebase_auth/firebase_auth.dart';
import 'package:cloud_firestore/cloud_firestore.dart';
import 'package:google_sign_in/google_sign_in.dart';
import 'package:kaida/src/features/auth/domain/models/app_user.dart';

class AuthRepository {
  final FirebaseAuth _firebaseAuth;
  final FirebaseFirestore _firestore;

  AuthRepository(this._firebaseAuth, this._firestore);

  // Existing methods...

  Future<void> verifyPhoneNumber(
      String phoneNumber,
      PhoneVerificationCompleted verificationCompleted,
      PhoneVerificationFailed verificationFailed,
      PhoneCodeSent codeSent,
      PhoneCodeAutoRetrievalTimeout codeAutoRetrievalTimeout) async {
    await _firebaseAuth.verifyPhoneNumber(
      phoneNumber: phoneNumber,
      verificationCompleted: verificationCompleted,
      verificationFailed: verificationFailed,
      codeSent: codeSent,
      codeAutoRetrievalTimeout: codeAutoRetrievalTimeout,
    );
  }

  Future<UserCredential> signInWithPhoneNumber(String verificationId, String smsCode) async {
    final credential = PhoneAuthProvider.credential(verificationId: verificationId, smsCode: smsCode);
    return await _firebaseAuth.signInWithCredential(credential);
  }
}
AuthNotifier:
Now let's add the verify phoneNumber() in AuthNotifier
class AuthNotifier extends StateNotifier<AuthState> {
  final AuthRepository _authRepository;

  AuthNotifier(this._authRepository) : super(const AuthStateInitial());

  // Existing methods...

  Future<void> verifyPhoneNumber(
    String phoneNumber,
    PhoneVerificationCompleted verificationCompleted,
    PhoneVerificationFailed verificationFailed,
    PhoneCodeSent codeSent,
    PhoneCodeAutoRetrievalTimeout codeAutoRetrievalTimeout,
  ) async {
    try {
      await _authRepository.verifyPhoneNumber(
        phoneNumber,
        verificationCompleted,
        verificationFailed,
        codeSent,
        codeAutoRetrievalTimeout,
      );
    } catch (e) {
      print('VerifyPhoneNumber Error: $e');
      throw e;
    }
  }

  Future<void> signInWithPhoneNumber(String verificationId, String smsCode) async {
    try {
      await _authRepository.signInWithPhoneNumber(verificationId, smsCode);
    } catch (e) {
      print('SignInWithPhoneNumber Error: $e');
      throw e;
    }
  }
}
PhoneVerificationPage:
We are creating a basic Phone Verification Page that'll take a code and verify it. Make sure to create separate forms for both phone text form field and verification code text form field
import 'package:firebase_auth/firebase_auth.dart';
import 'package:flutter/material.dart';
import 'package:flutter_hooks/flutter_hooks.dart';
import 'package:go_router/go_router.dart';
import 'package:hooks_riverpod/hooks_riverpod.dart';
import 'package:kaida/src/features/auth/provider/auth_providers.dart';

import '../../../../constants/routes.dart';

class PhoneVerificationPage extends HookConsumerWidget {
  const PhoneVerificationPage({super.key});

  @override
  Widget build(BuildContext context, WidgetRef ref) {
    final phoneFormKey = useMemoized(() => GlobalKey<FormState>());
    final codeFormKey = useMemoized(() => GlobalKey<FormState>());
    final phoneController = useTextEditingController();
    final codeController = useTextEditingController();
    final verificationId = useState<String?>(null);
    final errorMessage = useState<String?>(null);

    final authNotifier = ref.read(authNotifierProvider.notifier);

    String formatPhoneNumber(String phoneNumber) {

      if(phoneNumber.startsWith('+1')){
        return phoneNumber;
      } else {
        return '+1$phoneNumber';
      }
    }

    return Scaffold(
      appBar: AppBar(
        title: const Text('Verify Phone Number'),
      ),
      body: Padding(
        padding: const EdgeInsets.all(16.0),
        child: Column(
          children: [
            Form(
              key: phoneFormKey,
              child: Column(
                children: [
                  TextFormField(
                    controller: phoneController,
                    decoration:
                        const InputDecoration(labelText: 'Phone Number'),
                    keyboardType: TextInputType.phone,
                    validator: (value) {
                      if (value == null || value.isEmpty) {
                        return 'Please enter your phone number';
                      }
                      if (!RegExp(r'^\+?\d{10,}$').hasMatch(value)) {
                        return 'Please enter a valid phone number';
                      }
                      return null;
                    },
                  ),
                  const SizedBox(height: 20),
                  ElevatedButton(
                      onPressed: () async {
                        if (phoneFormKey.currentState?.validate() == true) {
                          try {
                            await authNotifier
                                .verifyPhoneNumber(formatPhoneNumber(phoneController.text.trim()),
                                    (PhoneAuthCredential credential) async {
                              await FirebaseAuth.instance
                                  .signInWithCredential(credential);
                              ScaffoldMessenger.of(context).showSnackBar(
                                  const SnackBar(
                                      content: Text('Phone number verified')));
                              context.go(Routes.profile);
                            }, (FirebaseAuthException e) {
                              errorMessage.value = e.toString();
                            }, (String mVerificationId, int? resendToken) {
                              verificationId.value = mVerificationId;

                              ScaffoldMessenger.of(context).showSnackBar(
                                  const SnackBar(
                                      content: Text('Verification code sent')));
                            }, (String mVerificationId) {
                              verificationId.value = mVerificationId;
                            });
                          } catch (e) {
                            errorMessage.value = e.toString();
                          }
                        }
                      },
                      child: const Text('Send Verification Code')),
                ],
              ),
            ),
            const SizedBox(height: 20),
            if (verificationId.value != null)
              Form(
                key: codeFormKey,
                child: Column(
                  children: [
                    TextFormField(
                      controller: codeController,
                      decoration:
                          const InputDecoration(labelText: 'Verification Code'),
                      keyboardType: TextInputType.number,
                      validator: (value) {
                        if (value == null || value.isEmpty) {
                          return 'Please enter the verification code';
                        }
                        return null;
                      },
                    ),
                    const SizedBox(height: 20),
                    ElevatedButton(
                        onPressed: () async {
                          if (codeFormKey.currentState?.validate() == true) {
                            try {
                              await authNotifier.signInWithPhoneNumber(
                                  verificationId.value!, codeController.text);
                              ScaffoldMessenger.of(context).showSnackBar(
                                  const SnackBar(
                                      content: Text('Phone Number Verified')));
                             context.go(Routes.profile);
                            } catch (e) {
                              errorMessage.value = e.toString();
                            }
                          }
                        },
                        child: const Text('Verify Code')),
                  ],
                ),
              ),
            if (errorMessage.value != null)
              Padding(
                padding: const EdgeInsets.only(top: 20),
                child: Text(
                  errorMessage.value!,
                  style: const TextStyle(color: Colors.red),
                ),
              ),
          ],
        ),
      ),
    );
  }
}
UserProfilePage:
For now I am just adding a button to go the Phone Verification Page from our existing user_profile_page.dart
import 'package:flutter/material.dart';
import 'package:hooks_riverpod/hooks_riverpod.dart';
import 'package:kaida/src/features/auth/provider/auth_providers.dart';
import 'package:kaida/src/constants/routes.dart';
import 'package:go_router/go_router.dart';

class UserProfilePage extends HookConsumerWidget {
  const UserProfilePage({Key? key}) : super(key: key);

  @override
  Widget build(BuildContext context, WidgetRef ref) {
    final authState = ref.watch(authNotifierProvider);

    if (authState is! AuthStateAuthenticated) {
      // Redirect to sign-in if not authenticated
      WidgetsBinding.instance.addPostFrameCallback((_) {
        context.go(Routes.signIn);
      });
      return const SizedBox.shrink();
    }

    return Scaffold(
      appBar: AppBar(
        title: const Text('User Profile'),
        actions: [
          IconButton(
            icon: const Icon(Icons.edit),
            onPressed: () {
              context.go(Routes.editProfile);
            },
          ),
          IconButton(
            icon: const Icon(Icons.lock),
            onPressed: () {
              context.go(Routes.changePassword);
            },
          ),
          IconButton(
            icon: const Icon(Icons.phone),
            onPressed: () {
              context.go(Routes.phoneVerification);
            },
          ),
          IconButton(
            icon: const Icon(Icons.logout),
            onPressed: () {
              ref.read(authNotifierProvider.notifier).signOut();
            },
          ),
        ],
      ),
      body: Center(
        child: Column(
          mainAxisAlignment: MainAxisAlignment.center,
          children: [
            Text('User ID: ${authState.userId}'),
            const SizedBox(height: 20),
            ElevatedButton(
              onPressed: () {
                context.go(Routes.editProfile);
              },
              child: const Text('Edit Profile'),
            ),
            ElevatedButton(
              onPressed: () {
                context.go(Routes.changePassword);
              },
              child: const Text('Change Password'),
            ),
            ElevatedButton(
              onPressed: () {
                context.go(Routes.phoneVerification);
              },
              child: const Text('Verify Phone Number'),
            ),
            ElevatedButton(
              onPressed: () {
                ref.read(authNotifierProvider.notifier).signOut();
              },
              child: const Text('Logout'),
            ),
          ],
        ),
      ),
    );
  }
}
Testing:
Finally let's test the app. We are going to test it on an iPhone in order for the app to send a code to the user and also to ensure that our verification works on actual device.
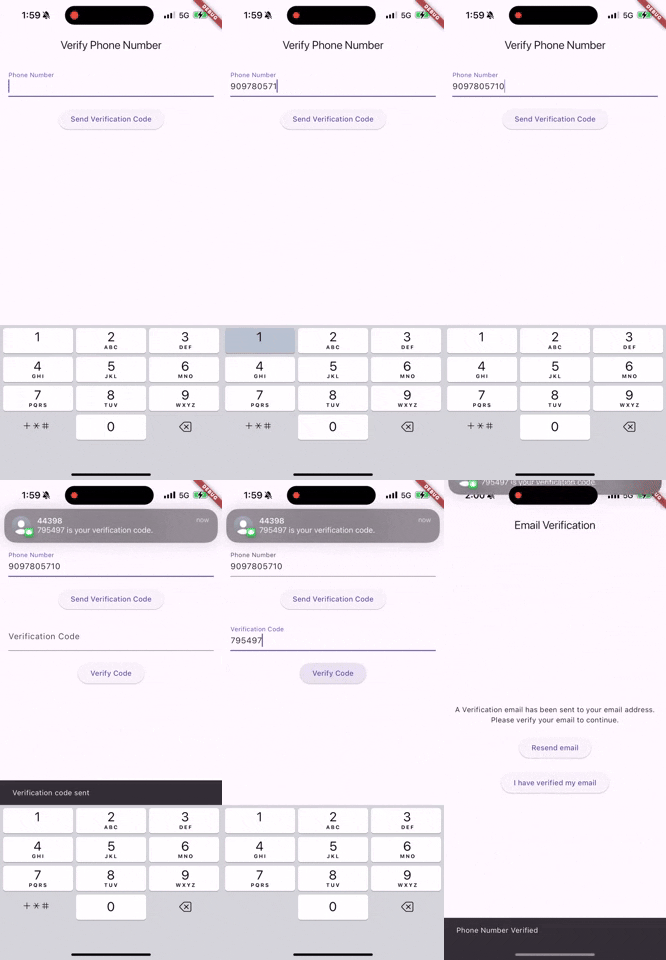
Perfect. Finally the app is working as intended. You can find the code here: https://github.com/khkred/kaida
Comments
Join the discussionNo comments yet. Be the first to comment.